
 Kimchi!
Glorious, tasty, stinky kimchi.
If you have never eaten kimchi than you must be warned it has an extremely strong flavor. It is garlicky and spicy and it WILL give you dragon breath. It will also stink up the kitchen (and quite possibly the house) for a little while when you eat it, too. Also note to self and any other pregnant woman... even if you LOVE kimchi with a burning hot crazy passion, it is probably NOT a good idea to eat half a jar of it by itself (or even wrapped up in some seaweed) in one sitting. You will tend to get a little gassier than usual and your husband will probably not appreciate the hours of stinky burps... especially if he doesn't like it in the first place!! Not that I would have any recent experience with that being the delicate flower that I am... ahem... : )
Now before I get started I have to share a link to this video on youtube that I watched before I did this myself. The recipe that I used is basically hers with the addition of carrots and I substituted daikon radish for a korean radish. If you are serious about making kimchi and feel a little intimidated just watch her video a few times and you will see how easy it actually is... that's what I did! : )
Alrighty let's get started!
ingredients:

2 heads napa cabbage
1 cup kosher salt
10 cups water
8 green onions
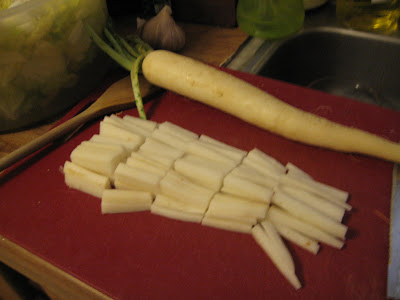
2 daikon radish
3 medium carrots
1 fuji apple
1 head garlic
1/2 large white onion
2 inch piece of ginger root
7 tbsp fish sauce
1/4 cup sugar
1 1/4 cup Korean chili powder
(you can find this (as well as the fish sauce) at an Asian market, it is a must and is NOT the same as other chili powders!)


Step 4:
Roughly chop the white onion, apple, garlic, and ginger root (all peeled). Put in a blender or processor with the fish sauce and blend until you have a smooth paste. In a large bowl add paste, Korean chili powder, and sugar together. Most recipes I saw used a LOT more sugar, but when you use the apple you don't need much, which was one reason I liked this recipe.

Step 5:
Stir julienned vegetables into paste and set aside until your cabbage is ready to go. The paste will be thick, but it will loosen up as the veggies soften and the cabbage has been added.

Step: 6
Drain cabbage and rinse at least three times. I rinsed mine about four, maybe five times. Every time you rinse them you remove a little more of the salt, so taste it after three rinses and test for your own preference... don't lose too much of the salt though because it will effect the flavor and possibly the fermentation process(?)...

Step 7:
Add the well drained cabbage into the large bowl with the prepared paste and vegetables. Use protective gloves to keep from staining and also burning your hands. Also be aware that the bowl you use will most likely be stained for awhile so keep that in mind when selecting it. I used a big old plastic one, the cabbage loses a lot of bulk while soaking in the brine, so you won't need as big a bowl as you did in the beginning(thank goodness for my cake lid!!)
When you are adding the cabbage to the paste make sure that you are massaging it in well, the paste needs to completely envelope all the cabbage and vegetables. It will be very saucy, but the moisture will lesson as time goes on (or not depending upon how fermented you like your kimchi!). Traditionally, the cabbage is not cut into small pieces but the quartered cabbages are kept intact and the paste is then put in between each leaf and wrapped in a super cool way, but it takes up more space to store it that way, and seemed a little more intimidating to me. I used pint sized canning jars to store mine, but you can use any tight sealed container. I wouldn't want to use plastic, but you can if you are planning on eating it right away. It is also traditionally put in clay pots and buried for weeks or months(that's how my mom learned how to make it back in the 70's).

You can eat the kimchi as it is and refrigerate it right away, or you can leave it out for a few days to start the fermentation process. I like it both ways. My batch made about 8 pint jars. I gave a few jars away, I refrigerated a few, and I left a few out to ferment. If you do choose to leave them out, put them in a dark area, in a container because as they ferment they will start to bubble and leak. You will know when they have started to ferment because you can watch the bubbles move up the sides of the jar. It's pretty fun to watch! : ) It can make quite a mess if you aren't prepared for it, though! I fermented some of mine for 2 days, and the rest for 4 days. I liked them ALL. The longer they fermented the more tingle on the tongue, and the more pungent the smell and flavor. I also noticed that the more fermented the less wet they seemed to be, as well. You can play around with it and figure which you like the best! I think my very favorite was the 2 day fermented... but the fresh was really good too... and so was the 4 day stuff... hmmm... I really can't decide!

Well, I hope that someone out there tries to actually make some kimchi and I will see if I can spread the kimchi love! I'm telling you once you try it and like it, it will become a never ending craving! : ) Enjoy!
Today I am thankful for my early introduction into the wonderful world of kimchi! My kids think it smells really good, but it is a little spicy for them just yet. I hope that someday they too will become addicted to this tasty, healthy treat! : )


6 comments:
I was so excited to see a new post from you! How are you feeling these days?
I'm very impressed that you make your own Kimchi! My dad had some authentic Kimchi when he was stationed in Korea. I've never had it, but it looks good! Do you use it as a condiment or a salad?
Yea! You're back. I've never had kimchi but have heard wonderful things about it. You should have a give away and give me a jar of that stuff.
Oh, I have some "sugar" for you over at my blog. Come by to pick it up!
It's good to hear from you!!! Hope you are doing well!!!
Kimchi...hmmm...well...hmmm. LOL!
thanks, ladies! I should have waited a day between posts, I also posted a more personal one first last night! : )
I am feeling pretty good and will be getting a follow up sonagram next Monday, to see how things are going.
try the kinchi ladies, I'm telling you it's awesome! : P
It looks delicious! I like garlic so this sounds wonderful :)
I've got something for you at my blog! Come on over at your convenience!
Post a Comment